Lens Selection & Installation
This guide shows you how to select the right lens for your application and safely replace lenses on the OV20i camera. The lens choice determines your Field of View (FOV) and working distance.
When to Use This Guide: When you need to change working distance, adjust field of view, or replace a damaged lens.
Prerequisites
- OV20i camera system
- Phillips-head screwdriver
- Replacement lens (6mm, 8mm, 12mm, 16mm, or 25mm)
- For 25mm lens: Additional spacer kit components
Step 1: Calculate Required Lens Size
1.1 Determine Your Requirements
- Working Distance: How far the camera will be from parts
- Field of View: How wide an area you need to inspect
- Part Size: Dimensions of the parts you're inspecting
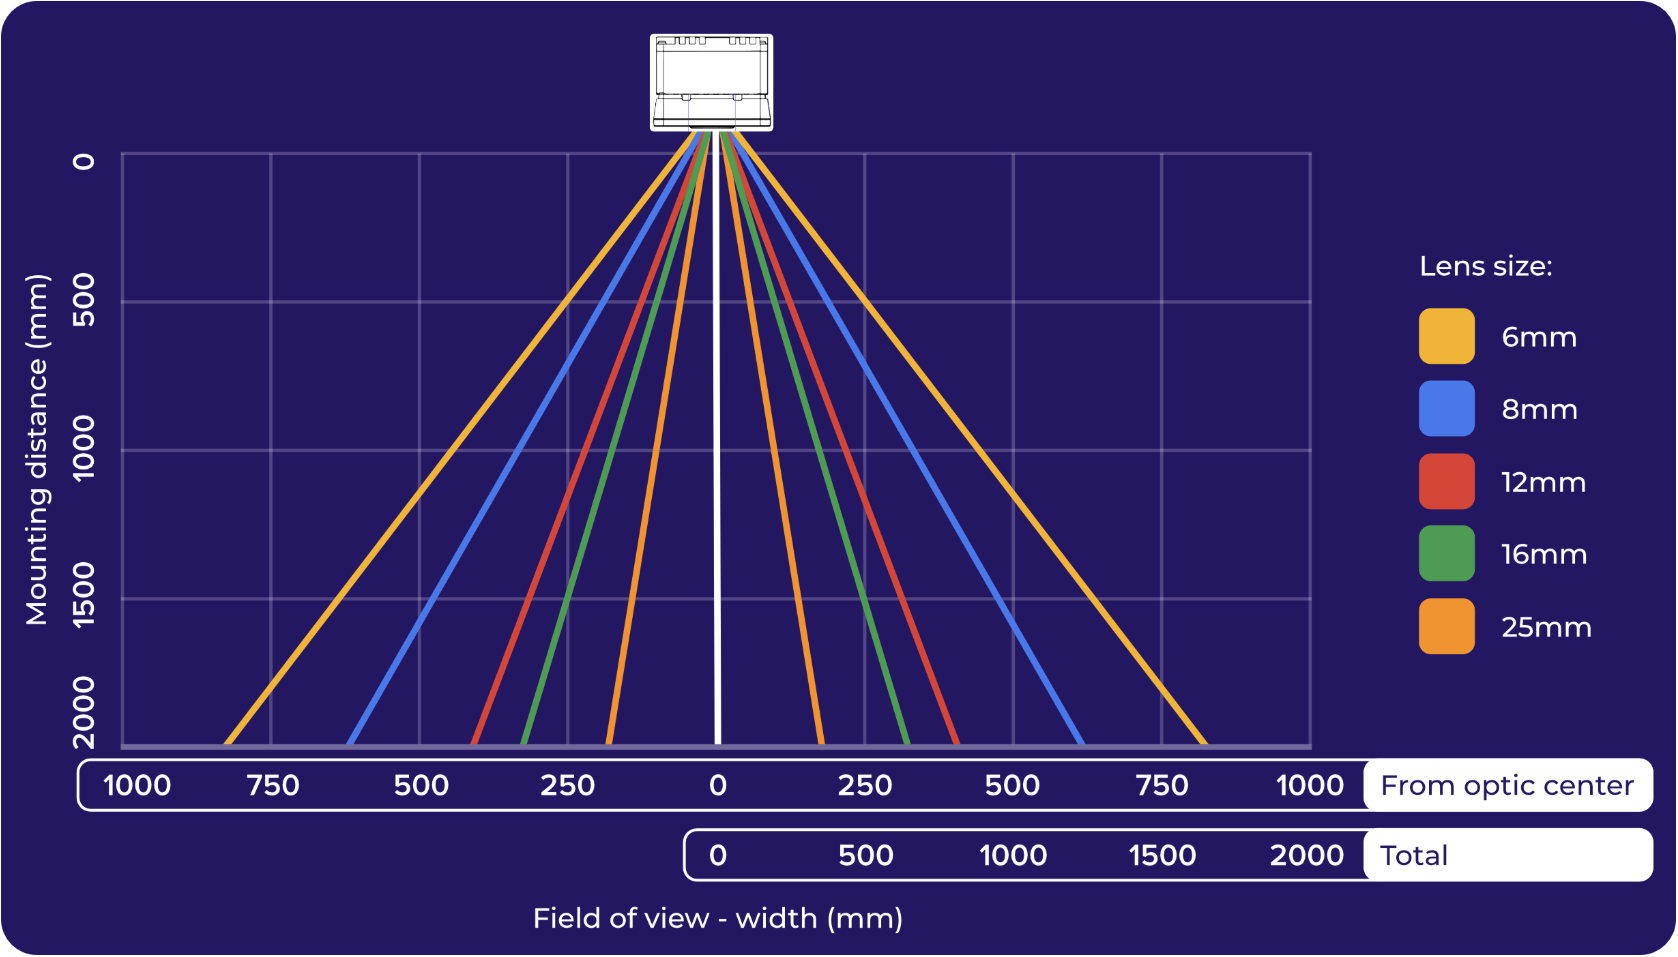
1.2 Use FOV Chart for Lens Selection
Field of View (FOV) Widths at Different Distances:

Camera Specifications:
- Aspect Ratio: 4:3
- FOV Height: Width × 0.75
- Standard Lens: 12mm (ships with camera)
1.3 Online Calculator
Use the OV20i Calculator for precise FOV calculations based on your specific mounting distance and lens requirements.
Step 2: Standard Lens Replacement (6mm to 16mm)
2.1 Remove Faceplate
- Power down the camera
- Remove four corner screws on the faceplate using Phillips-head screwdriver
- Carefully lift off the faceplate to expose the LED board and lens
2.2 Replace Lens
- Unscrew existing lens by turning counterclockwise (hand-tight only)
- Install new lens by turning clockwise
- Hand-tighten only - do NOT use tools to avoid damage
Over-tightening can damage the lens or camera threads.
2.3 Reassemble
- Replace faceplate on camera
- Secure with four screws removed earlier
- Power on and test focus
Step 3: 25mm Lens Installation (Special Procedure)
3.1 Additional Components Required
- M12 25mm lens
- 15mm faceplate spacer
- Spacer rings
- 4x M3x22 socket head cap screws
3.2 Determine Spacer Configuration
- Remove faceplate as in Step 2.1
- Set up camera at working distance
- Slowly screw in lens until image is sharp
- Measure lens extension beyond mount
- Select spacer rings to match measured distance
3.3 Install 25mm Lens
- Slide spacer rings onto lens to correct size
- Install lens with spacers into camera mount
- Hand-tighten clockwise
- Attach 15mm faceplate spacer with M3x22 screws
- Place original faceplate onto spacer
Step 4: Focus and Test
4.1 Initial Focus Check
- Power on camera
- Navigate to Imaging Setup in camera interface
- Use Focus View to achieve optimal sharpness
- Adjust focus using camera controls
4.2 Verify Field of View
- Check FOV covers required inspection area
- Ensure part positioning fills appropriate portion of image
- Confirm image quality meets inspection requirements
Lens Selection Quick Reference
| Lens Size | FOV at 100mm | FOV at 1m | FOV at 2m | Best Use |
|---|---|---|---|---|
| 6mm | Wide FOV | Very Wide | Extremely Wide | Large parts, close inspection |
| 8mm | Medium-Wide | Wide | Very Wide | General purpose, medium parts |
| 12mm (Standard) | Medium | Medium | Wide | Most applications |
| 16mm | Narrow | Medium | Medium | Smaller parts, detail work |
| 25mm | Very Narrow | Narrow | Medium | Precision inspection, small features |
Safety and Best Practices
Lens Handling
- Handle lenses carefully - avoid touching glass surfaces
- Use lens cleaning cloth for any smudges
- Store removed lenses in protective cases
- Check threads for damage before installation
Installation Tips
- Always hand-tighten - never use tools on lens threads
- Test fit before final tightening
- Keep screws organized during disassembly
- Power down camera before lens changes
Success! Your Lens is Installed
Your OV20i camera now has:
✅ Correct lens for your application requirements
✅ Proper field of view for part inspection
✅ Optimal working distance for your setup
✅ Secure mounting for reliable operation
Next Steps
After lens installation:
- Configure imaging settings for new lens
- Update focus for optimal sharpness
- Test with actual parts to verify coverage
- Adjust camera position if needed for optimal FOV
- Document lens configuration for future reference